南京市网站开发怎样搭建网站
============各位看官,点波关注和赞吧===========
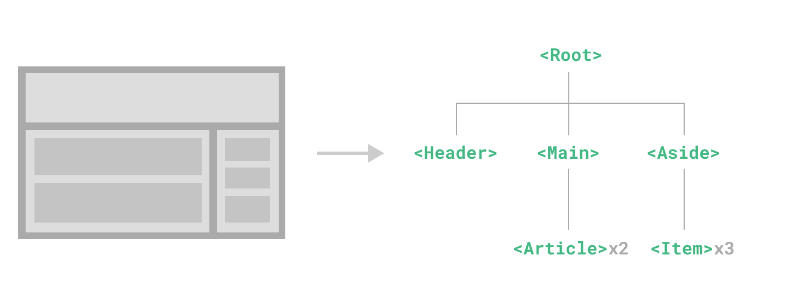
组件允许我们将 UI 划分为独立的、可重用的部分,并且可以对每个部分进行单独的思考。在实际应用中,组件常常被组织成层层嵌套的树状结构:
这和我们嵌套 HTML 元素的方式类似,Vue 实现了自己的组件模型,使我们可以在每个组件内封装自定义内容与逻辑。Vue 同样也能很好地配合原生 Web Component(网络组件)。
🌲 定义一个组件
当使用构建步骤时,我们一般会将 Vue 组件定义在一个单独的 .vue 文件中,这被叫做单文件组件 (简称 SFC):
<script setup>
import { ref } from 'vue'const count = ref(0)
</script><template><button @click="count++">You clicked me {{ count }} times.</button>
</template>
🌲 使用组件
要使用一个子组件,我们需要在父组件中导入它。假设我们把计数器组件放在了一个叫做 Counter.vue 的文件中,这个组件将会以默认导出的形式被暴露给外部。
<script setup>import { ref } from 'vue'const count = ref(0)
</script><template><button @click="count++">You clicked me {{ count }} times.</button>
</template>
在App.vue中可以这样引用
<script setup>import ButtonCounter from './components/Counter.vue'
</script><template><h2> 下面是一个子组件</h2><ButtonCounter></ButtonCounter>
</template>
组件可以被重用任意多次:
<h1>这里是一个子组件!</h1>
<ButtonCounter />
<ButtonCounter />
<ButtonCounter />
你会注意到,每当点击这些按钮时,每一个组件都维护着自己的状态,是不同的 count。这是因为每当你使用一个组件,就创建了一个新的实例。
在单文件组件中,推荐为子组件使用 驼峰命名法的标签名,以此来和原生的 HTML 元素作区分。虽然原生 HTML 标签名是不区分大小写的,但 Vue 单文件组件是可以在编译中区分大小写的。我们也可以使用 /> 来关闭一个标签。
🌲 传递Props
🌾 Props初体验
如果我们正在构建一个博客,我们可能需要一个表示博客文章的组件。我们希望所有的博客文章分享相同的视觉布局,但有不同的内容。要实现这样的效果自然必须向组件中传递数据,例如每篇文章标题和内容,这就会使用到 props。
Props 是一种特别的 attributes,你可以在组件上声明注册。要传递给博客文章组件一个标题,我们必须在组件的 props 列表上声明它。这里要用到 defineProps 宏:
<!-- BlogPost.vue -->
<script setup>const props = defineProps(['title'])console.log(props.title)
</script><template><h4>{{ title }}</h4>
</template>
defineProps 是一个仅 <script setup> 中可用的编译宏命令,并不需要显式地导入。声明的 props 会自动暴露给模板。defineProps 会返回一个对象,其中包含了可以传递给组件的所有 props.
一个组件可以有任意多的 props,默认情况下,所有 prop 都接受任意类型的值。
当一个 prop 被注册后,可以像这样以自定义 attribute 的形式传递数据给它:
<script setup>import BlogPost from './components/BlogPost.vue'
</script><template><BlogPost title="山海经"></BlogPost>
</template>
在实际应用中,我们可能在父组件中会有如下的一个博客文章数组:
<script setup>import {ref} from 'vue'import BlogPost from './components/BlogPost.vue'const posts = ref([{id:1,title:"钢铁是怎样练成的"},{id:2,title:"坏蛋是怎样练成的"},{id:3,title:"秦始皇是怎样练成的"},])</script><template><BlogPost v-for="post in posts":id="post.id":title="post.title"></BlogPost>
</template>
<!-- BlogPost.vue -->
<script setup>const props = defineProps(['id','title']) console.log(props.title)
</script><template><h4>{{ id }}--《{{ title }}》</h4>
</template>🌾 传递Prop的细节
🍁 传递不同的值类型
除了传递简单的字符串以外,Prop还可以传递数组以及对象,具体如下:
<script lang="ts" setup>import {reactive,markRaw, ref} from 'vue'import BlogPost from './components/BlogPost.vue';const post = reactive({"likes":56,"isDisabled":true,"wifes":['苍老师','波多老师','陇泽老师']})const author = {name:'兰陵笑笑生',company:'水浒分舵'}</script><template><!-- 传入数字 --><BlogPost :likes="42"></BlogPost><!-- 根据一个变量的值动态传入 --><BlogPost :likes="post.likes"></BlogPost><!-- 传入boolean类型的值 --><!-- 仅写上 prop 但不传值,会隐式转换为 `true` --><BlogPost disabled></BlogPost>
<!--  --><BlogPost :disabled="false"></BlogPost>
<!-- 根据一个变量的值动态传入 --><BlogPost :disabled="post.isDisabled"></BlogPost><!-- 传入一个数组Array --><BlogPost :wifes="['赵丽颖','刘亦菲','景甜']"></BlogPost><!-- 传入一个数组Array变量 --><BlogPost :wifes="post.wifes"></BlogPost><!--传入一个Object对象--><BlogPost :author="author"></BlogPost>
</template><style ></style>
子组件中代码:
<!-- BlogPost.vue -->
<script setup>const props = defineProps(["likes","disabled","wifes","author"])</script><template><h4>取到的值为:{{ likes }}</h4><button :disabled="disabled"> Enlarge text</button><h2 v-for="wife in wifes">{{ wife }}</h2><h2 v-if="author">作者:{{ author.name }}  - 公司:{{ author.company }}</h2>
</template>
🍁 使用一个对象绑定多个prop
如果你想要将一个对象的所有属性都当作 props 传入,你可以使用没有参数的v-bind,即只使用 v-bind 而非 :prop-name。例如,这里有一个 post 对象:
<script lang="ts" setup>import {reactive,markRaw, ref} from 'vue'const post = {id: 1,title: '熊熊火焰'}
</script><template><BlogPost v-bind="post" />
</template>
运行起来后:

🍁 单向数据流
所有的 props 都遵循着单向绑定原则,props 因父组件的更新而变化,自然地将新的状态向下流往子组件,而不会逆向传递。这避免了子组件意外修改父组件的状态的情况,不然应用的数据流将很容易变得混乱而难以理解。
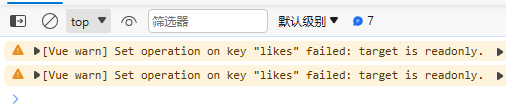
另外,每次父组件更新后,所有的子组件中的 props 都会被更新到最新值,这意味着你不应该在子组件中去更改一个 prop。若你这么做了,Vue 会在控制台上向你抛出警告:
如下面案例:
<script lang="ts" setup>import {reactive,markRaw, ref} from 'vue'import BlogPost from './components/BlogPost.vue';const post = {id: 1,title: '熊熊火焰'}
</script><template><BlogPost v-bind="post" /><BlogPost :likes="post.id"></BlogPost>
</template><style ></style>
在子组件中我们尝试去修改likes的值:
<!-- BlogPost.vue -->
<script setup>const props = defineProps(["likes","disabled","wifes","author"])props.likes = 3
</script><template><h4>取到的值为:{{ likes }}</h4></template>
保存后,浏览器会报:
如果确实想要修改props中的值,可以采取以下方式:
- prop 被用于传入初始值;而子组件想在之后将其作为一个局部数据属性。在这种情况下,最好是新定义一个局部数据属性,从 props 上获取初始值即可:
<!-- BlogPost.vue -->
<script setup>import {ref} from 'vue'const props = defineProps(["likes","disabled","wifes","author"])// 此处的likes只是将prop.likes作为初始值// 后续对这个likes的更改就和prop无关了// let 定义变量,const定义常量let likes = ref(props.likes)likes = 1001
</script><template><h4>取到的值为:{{ likes }}</h4></template>
🍁 Prop 校验
Vue 组件可以更细致地声明对传入的 props 的校验要求。比如我们上面已经看到过的类型声明,如果传入的值不满足类型要求,Vue 会在浏览器控制台中抛出警告来提醒使用者。这在开发给其他开发者使用的组件时非常有用。
要声明对 props 的校验,你可以向 defineProps() 宏提供一个带有 props 校验选项的对象,例如:
<!-- BlogPost.vue -->
<script setup>import {ref} from 'vue'defineProps({// 基础类型检查// (给出 `null` 和 `undefined` 值则会跳过任何类型检查)propA: Number,// 多种可能的类型propB: [String, Number],// 必传,且为 String 类型propC: {type: String,required: true},// Number 类型的默认值propD: {type: Number,default: 100},// 对象类型的默认值propE: {type: Object,// 对象或数组的默认值// 必须从一个工厂函数返回。// 该函数接收组件所接收到的原始 prop 作为参数。default(rawProps) {return { message: 'hello' }}},// 自定义类型校验函数propF: {validator(value) {// The value must match one of these stringsreturn ['success', 'warning', 'danger'].includes(value)}},// 函数类型的默认值propG: {type: Function,// 不像对象或数组的默认,这不是一个// 工厂函数。这会是一个用来作为默认值的函数default() {return 'Default function'}}
})
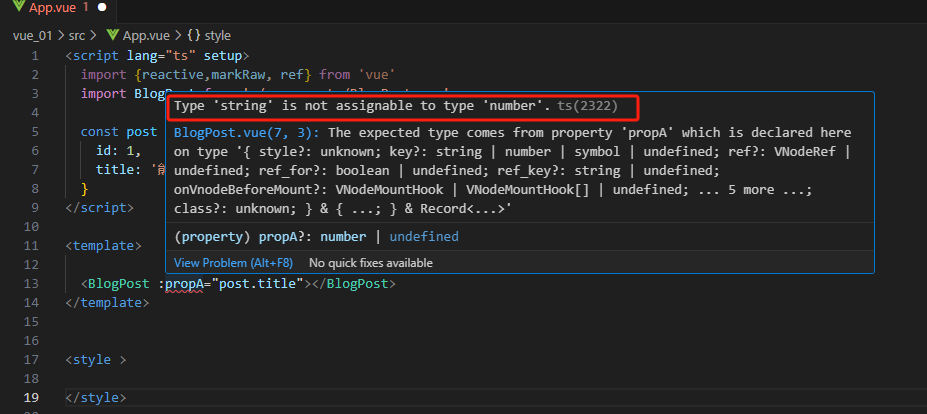
</script><template><h4>取到的值为:{{ propA }}</h4><h4>取到PropC的值为:{{ propC }}</h4><h4>取到PropD的值为:{{ propD }}</h4></template><script lang="ts" setup>import {reactive,markRaw, ref} from 'vue'import BlogPost from './components/BlogPost.vue';const post = {id: 1,title: '熊熊火焰'}
</script><template><BlogPost :propA="post.id"></BlogPost><BlogPost :propC="post.title"></BlogPost>
</template><style ></style>
这里propA要求的值是Number,当传递的值是字符串类型的时候,就会报错:
🌲 监听事件
让我们继续关注我们的 <BlogPost> 组件。我们会发现有时候它需要与父组件进行交互。例如,要在此处实现无障碍访问的需求,将博客文章的文字能够放大,而页面的其余部分仍使用默认字号。
在父组件中,我们可以添加一个 postFontSize ref 来实现这个效果:
<script setup>import {ref} from 'vue'import BlogPost from './components/BlogPost.vue'const posts = ref([{id:1,title:"钢铁是怎样练成的"},{id:2,title:"坏蛋是怎样练成的"},{id:3,title:"秦始皇是怎样练成的"},])const postFontSize = ref(1)</script>这里我们定义了一个postFontSize这样一个值,在模板中用它来控制所有博客文章的字体大小:
<div :style="{ fontSize: postFontSize + 'em' }"><BlogPostv-for="post in posts":key="post.id":title="post.title"/>
</div>
然后,给 <BlogPost> 组件添加一个按钮:
<!-- BlogPost.vue -->
<script setup>const props = defineProps(['id','title'])console.log(props.title)</script><template><h4>{{ id }}--《{{ title }}》</h4><!--点击之后,会抛出一个名为enlarge-text的事件,这个事件名可以自定义  --><button @click="$emit('enlarge-text')"> Enlarge text</button>
</template>
在这里,我们使用了@click 点击事件,子组件可以通过调用内置的$emit方法,通过传入事件名称来抛出一个事件。 抛出事件后,父组件可以通过 v-on 或 @ 来选择性地监听子组件上抛的事件,就像监听原生 DOM 事件那样:
<template><div :style="{fontSize:postFontSize +'em'}"><BlogPost v-for="post in posts":id="post.id":title="post.title"<!-- 此处是子组件抛出来的enlarge-text 事件,事件名和子组件抛出来名字要的对应 -->@enlarge-text="postFontSize += 0.1"></BlogPost>
</div>
</template>
我们可以通过 defineEmits 宏来声明需要抛出的事件:
<!-- BlogPost.vue -->
<script setup>const props = defineProps(['id','title'])console.log(props.title)// 可以定义出这个组件可能触发的所有的事件const emit = defineEmits(['enlarge-text','event2','event3'])// 当点击 Enlarge text 的时候需要抛出的事件const large = ()=>{emit('enlarge-text')}
</script><template><h4>{{ id }}--《{{ title }}》</h4><button @click="large"> Enlarge text</button>
</template>
这声明了一个组件可能触发的所有事件,父组件中还是按照之前的方式监听子组件抛出的事件。
<script setup>import {ref} from 'vue'import BlogPost from './components/BlogPost.vue'const posts = ref([{id:1,title:"钢铁是怎样练成的"},{id:2,title:"坏蛋是怎样练成的"},{id:3,title:"秦始皇是怎样练成的"},])const postFontSize = ref(1)</script><template><div :style="{fontSize:postFontSize +'em'}"><BlogPost v-for="post in posts":id="post.id":title="post.title"@enlarge-text="postFontSize += 0.1"></BlogPost>
</div>
</template>
🌲 通过插槽来分配内容
🌿 插槽初体验
一些情况下我们会希望能和 HTML 元素一样向组件中传递内容:
<AlertBox>Something bad happened.
</AlertBox>
我们期望能渲染成这样:

这可以通过 Vue 的自定义 <slot> 元素来实现:
<template><div class="alert-box"><div>老弟!这里发生了一个状况!</div><div ><!-- slot 这是一个占位符,父组件传过来的值,会渲染在这个地方 --><slot /></div></div>
</template><style >.alert-box{width: 500px;height: 80px;border-radius: 10px;border: 1px solid red;background-color: antiquewhite;}.alert-box div{display: block;margin-top: 10px;margin-left: 20px;}
</style>
如上所示,我们使用 <slot> 作为一个占位符,父组件传递进来的内容就会渲染在这里。在父组件中可以引入子组件,并插入值。
<AlertBox>你的老婆跟别人跑了!
</AlertBox>
🌿 插槽的出口与内容
在上面的案例中:
<AlertBox>你的老婆跟别人跑了!
</AlertBox>
父组件中提供了子组件中显示的内容,这个内容成为插槽内容,而在子组件中我们写了一个
<div ><!-- slot 这是一个占位符,父组件传过来的值,会渲染在这个地方 --><slot /></div>这个地方的<slot> 元素,我们称为插槽出口,标识了父元素提供的插槽内容将在哪里被渲染。
🌲 动态组件
有些场景会需要在两个组件间来回切换,比如 Tab 界面:

动态组件是通过Vue 的 <component> 元素和特殊的 is attribute 实现的:
<template><div class="gz">这里是关注页面</div>
</template><style>.gz{width: 100%;height: 800px;background-color: red;}
</style>
<template><div class="TJ">这里是推荐页面</div>
</template><style>.TJ{width: 100%;height: 800px;background-color: blue;}
</style><template><div class="cp">这里是测评页面</div>
</template><style>.cp{width: 100%;height: 800px;background-color: yellow;}
</style>然后在App.vue中导入所有的组件,并使用<component :is="指定组件名">来选择引用哪个组件
<script setup>import {reactive,markRaw, ref} from 'vue'import TJ from './components/TJ.vue';import GZ from './components/GZ.vue';import CP from './components/CP.vue';
</script><template><component :is="CP"></component>
</template>
如果想要实现选项卡操作,可以将App.vue修改成如下代码
<script setup>import {reactive,markRaw, ref} from 'vue'import TJ from './components/TJ.vue';import GZ from './components/GZ.vue';import CP from './components/CP.vue';const comId = ref(GZ)const switchTab=(tab,index)=>{comId.value = tab.com}const tabData = reactive([{"name":"关注",com:GZ},{"name":"推荐",com:TJ},{"name":"测评",com:CP}])
</script><template><!-- 组成选项卡div --><div class="tabs-content" @click="switchTab(tab)" v-for="(tab, index) in tabData" :key="index">{{ tab.name }}</div><!-- 动态选择组件 --><component :is="comId"></component>
</template><style >
.tabs-content {display: inline-block;width: 100px;border: 1px solid #ccc;background: rgb(175, 96, 96);color: white;
}
</style>