18种禁用软件黄app入口河南平价的seo整站优化定制
机器学习样本数据划分的典型Python方法
| Date | Author | Version | Note |
|---|---|---|---|
| 2023.08.16 | Dog Tao | V1.0 | 完成文档撰写。 |
文章目录
- 机器学习样本数据划分的典型Python方法
- 样本数据的分类
- Training Data
- Validation Data
- Test Data
- numpy.ndarray类型数据
- 直接划分
- 交叉验证
- 基于`KFold`
- 基于`RepeatedKFold`
- 基于`cross_val_score`
- torch.tensor类型数据
- 直接划分
- 基于TensorDataset
- 基于切片方法
- 交叉验证
样本数据的分类
In machine learning and deep learning, the data used to develop a model can be divided into three distinct sets: training data, validation data, and test data. Understanding the differences among them and their distinct roles is crucial for effective model development and evaluation.
Training Data
- Purpose: The training data is used to train the model. It’s the dataset the algorithm will learn from.
- Usage: The model parameters are adjusted or “learned” using this data. For example, in a neural network, weights are adjusted using backpropagation on this data.
- Fraction: Typically, a significant majority of the dataset is allocated to training (e.g., 60%-80%).
- Issues: Overfitting can be a concern if the model becomes too specialized to the training data, leading it to perform poorly on unseen data.
Validation Data
- Purpose: The validation data is used to tune the model’s hyperparameters and make decisions about the model’s structure (e.g., choosing the number of hidden units in a neural network or the depth of a decision tree).
- Usage: After training on the training set, the model is evaluated on the validation set, and adjustments to the model (like changing hyperparameters) are made based on this evaluation. The process might be iterative.
- Fraction: Often smaller than the training set, typically 10%-20% of the dataset.
- Issues: Overfitting to the validation set can happen if you make too many adjustments based on the validation performance. This phenomenon is sometimes called “validation set overfitting” or “leakage.”
Test Data
- Purpose: The test data is used to evaluate the model’s final performance after training and validation. It provides an unbiased estimate of model performance in real-world scenarios.
- Usage: Only for evaluation. The model does not “see” this data during training or hyperparameter tuning. Once the model is finalized, it is tested on this dataset to gauge its predictive performance.
- Fraction: Typically, 10%-20% of the dataset.
- Issues: To preserve the unbiased nature of the test set, it should never be used to make decisions about the model. If it’s used in this way, it loses its purpose, and one might need a new test set.
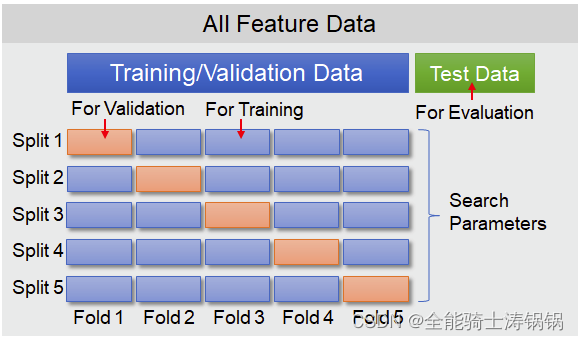
Note: The exact percentages mentioned can vary based on the domain, dataset size, and specific methodologies. In practice, strategies like k-fold cross-validation might be used, where the dataset is split into k subsets, and the model is trained and validated multiple times, each time using a different subset as the validation set and the remaining data as the training set.
In summary, the distinction among training, validation, and test data sets is crucial for robust model development, avoiding overfitting, and ensuring that the model will generalize well to new, unseen data.
numpy.ndarray类型数据
直接划分
To split numpy.ndarray data into a training set and validation set, you can use the train_test_split function provided by the sklearn.model_selection module.
Here’s a brief explanation followed by an example:
-
Function Name:
train_test_split() -
Parameters:
- arrays: Sequence of indexables with the same length. Can be any data type.
- test_size: If float, should be between 0.0 and 1.0, representing the proportion of the dataset to include in the test split. If int, represents the absolute number of test samples.
- train_size: Complement to
test_size. If not provided, the value is set to the complement of the test size. - random_state: Seed for reproducibility.
- shuffle: Whether to shuffle before splitting. Default is True.
- stratify: If not None, the data is split in a stratified fashion using this as the class labels.
-
Returns: Split arrays.
Example:
Let’s split an example dataset into a training set (80%) and a validation set (20%):
import numpy as np
from sklearn.model_selection import train_test_split# Sample data
X = np.random.rand(100, 5)  # 100 samples, 5 features
y = np.random.randint(0, 2, 100)  # 100 labels, binary classification# Split the data
X_train, X_val, y_train, y_val = train_test_split(X, y, test_size=0.2, random_state=42)print("Training set size:", len(X_train))
print("Validation set size:", len(X_val))
- If you want the split to be reproducible (i.e., get the same split each time you run the code), set the
random_stateto any integer value. - If you’re working with imbalanced datasets and want to ensure that the class distribution is the same in both the training and validation sets, you can use the
stratifyparameter. Settingstratify=ywill ensure that the splits have the same class distribution as the original dataset.
交叉验证
基于KFold
For performing ( n )-fold cross-validation on numpy.ndarray data, you can use the KFold class from the sklearn.model_selection module.
Here’s how you can use ( n )-fold cross-validation:
-
Class Name:
KFold -
Parameters of
KFold:- n_splits: Number of folds.
- shuffle: Whether to shuffle the data before splitting into batches.
- random_state: Seed used by the random number generator for reproducibility.
Example:
Let’s say you want 5-fold cross-validation:
import numpy as np
from sklearn.model_selection import KFold# Sample data
X = np.random.rand(100, 5)  # 100 samples, 5 features
y = np.random.randint(0, 2, 100)  # 100 labels, binary classificationkf = KFold(n_splits=5, shuffle=True, random_state=42)for train_index, val_index in kf.split(X):X_train, X_val = X[train_index], X[val_index]y_train, y_val = y[train_index], y[val_index]print("Training set size:", len(X_train))print("Validation set size:", len(X_val))print("---")
- Each iteration in the loop gives you a different split of training and validation data.
- The training and validation indices are generated based on the size of
X. - If you want the split to be reproducible (i.e., get the same split each time you run the code), set the
random_stateparameter. - In case you want stratified k-fold cross-validation (where the folds are made by preserving the percentage of samples for each class), use
StratifiedKFoldinstead ofKFold. This can be particularly useful for imbalanced datasets.
基于RepeatedKFold
RepeatedKFold repeats K-Fold cross-validator. For each repetition, it splits the dataset into k-folds and then the k-fold cross-validation is performed. This results in having multiple scores for multiple runs, which might give a more comprehensive evaluation of the model’s performance.
Parameters:
- n_splits: Number of folds.
- n_repeats: Number of times cross-validator needs to be repeated.
- random_state: Random seed for reproducibility.
Example:
import numpy as np
from sklearn.model_selection import RepeatedKFoldX = np.array([[1, 2], [3, 4], [5, 6], [7, 8]])
y = np.array([1, 2, 3, 4])rkf = RepeatedKFold(n_splits=2, n_repeats=2, random_state=42)for train_index, test_index in rkf.split(X):print("TRAIN:", train_index, "TEST:", test_index)X_train, X_test = X[train_index], X[test_index]y_train, y_test = y[train_index], y[test_index]
基于cross_val_score
cross_val_score evaluates a score by cross-validation. It’s a quick utility that wraps both the steps of splitting the dataset and evaluating the estimator’s performance.
Parameters:
- estimator: The object to use to fit the data.
- X: The data to fit.
- y: The target variable for supervised learning problems.
- cv: Cross-validation strategy.
- scoring: A string (see model evaluation documentation) or a scorer callable object/function.
Example:
Here’s an example using RepeatedKFold with cross_val_score for a simple regression model:
from sklearn.datasets import make_regression
from sklearn.linear_model import LinearRegression
from sklearn.model_selection import cross_val_score, RepeatedKFold# Generate a sample dataset
X, y = make_regression(n_samples=1000, n_features=20, noise=0.1)# Define the model
model = LinearRegression()# Define the evaluation procedure
cv = RepeatedKFold(n_splits=10, n_repeats=3, random_state=1)# Evaluate the model
scores = cross_val_score(model, X, y, scoring='neg_mean_absolute_error', cv=cv, n_jobs=-1)# Summary of performance
print('Mean MAE: %.3f (%.3f)' % (np.mean(scores), np.std(scores)))
In the above example:
cross_val_scoreis used to evaluate the performance of aLinearRegressionmodel using the mean absolute error (MAE) metric.- We employ a 10-fold cross-validation strategy that is repeated 3 times, as specified by
RepeatedKFold. - The scores from all these repetitions and folds are aggregated into the
scoresarray.
Note:
- In the scoring parameter, the ‘neg_mean_absolute_error’ is used because in
sklearn, the convention is to maximize the score, so loss functions are represented with negative values (the closer to 0, the better).
torch.tensor类型数据
直接划分
基于TensorDataset
To split a tensor into training and validation sets, you can use the random_split method from torch.utils.data. This is particularly handy when you’re dealing with Dataset objects, but it can also be applied directly to tensors with a bit of wrapping.
Here’s how you can do it:
-
Wrap your tensor in a TensorDataset:
Before usingrandom_split, you might need to wrap your tensors in aTensorDatasetso they can be treated as a dataset. -
Use
random_splitto divide the dataset:
Therandom_splitfunction requires two arguments: the dataset you’re splitting and a list of lengths for each resulting subset.
Here’s an example using random_split:
import torch
from torch.utils.data import TensorDataset, random_split# Sample tensor data
X = torch.randn(1000, 10)  # 1000 samples, 10 features each
Y = torch.randint(0, 2, (1000,))  # 1000 labels# Wrap tensors in a dataset
dataset = TensorDataset(X, Y)# Split into 80% training (800 samples) and 20% validation (200 samples)
train_size = int(0.8 * len(dataset))
val_size = len(dataset) - train_size
train_dataset, val_dataset = random_split(dataset, [train_size, val_size])print(len(train_dataset))  # 800
print(len(val_dataset))    # 200
Once you’ve split your data into training and validation sets, you can easily load them in batches using DataLoader if needed.
-
The
random_splitmethod does not actually make a deep copy of the dataset. Instead, it returnsSubsetobjects that internally have indices to access the original dataset. This makes the splitting operation efficient in terms of memory. -
Each time you call
random_split, the split will be different because the method shuffles the indices. If you want reproducibility, you should set the random seed usingtorch.manual_seed()before callingrandom_split.
The resulting subsets from random_split can be directly passed to DataLoader to create training and validation loaders:
from torch.utils.data import DataLoadertrain_loader = DataLoader(train_dataset, batch_size=32, shuffle=True)
val_loader = DataLoader(val_dataset, batch_size=32, shuffle=False)
This allows you to efficiently iterate over the batches of data during training and validation.
If you have a TensorDataset and you want to retrieve all the data pairs from it, you can simply iterate over the dataset. Each iteration will give you a tuple where each element of the tuple corresponds to a tensor in the TensorDataset.
Here’s an example:
import torch
from torch.utils.data import TensorDataset# Sample tensor data
X = torch.randn(100, 10)  # 100 samples, 10 features each
Y = torch.randint(0, 2, (100,))  # 100 labels# Wrap tensors in a dataset
dataset = TensorDataset(X, Y)# Get all data pairs
data_pairs = [data for data in dataset]# If you want to get them separately
X_data, Y_data = zip(*data_pairs)# Convert back to tensors if needed
X_data = torch.stack(X_data)
Y_data = torch.stack(Y_data)print(X_data.shape)  # torch.Size([100, 10])
print(Y_data.shape)  # torch.Size([100])
In the code above:
- We first create a
TensorDatasetfrom sample data. - Then, we use list comprehension to retrieve all data pairs from the dataset.
- Finally, we separate the features and labels using the
zipfunction, and then convert them back to tensors.
The zip(*data_pairs) expression is a neat Python trick that involves unpacking and transposing pairs (or tuples) of data.
To break it down:
-
zipfunction: This is a built-in Python function that allows you to iterate over multiple lists (or other iterable objects) in parallel. For example, if you have two listsa = [1,2,3]andb = [4,5,6], callingzip(a,b)will yield pairs(1,4),(2,5), and(3,6). -
The
*unpacking operator: When used in a function call, it unpacks a list (or tuple) into individual elements. For instance, if you havefunc(*[1,2,3]), it’s the same as callingfunc(1,2,3).
When you use them together as in zip(*data_pairs), you’re doing the following:
- Unpacking the
data_pairs: This treats the list of tuples indata_pairsas separate arguments tozip. - Transposing with
zip: Since each element ofdata_pairsis a tuple of (X, Y), usingzipeffectively transposes the data, separating all the X’s from the Y’s.
Here’s a simple example to illustrate:
data_pairs = [(1, 'a'), (2, 'b'), (3, 'c')]
x_data, y_data = zip(*data_pairs)
print(x_data)  # Outputs: (1, 2, 3)
print(y_data)  # Outputs: ('a', 'b', 'c')
In the context of our previous discussion, this operation allowed us to efficiently separate the feature tensors from the label tensors in the TensorDataset.
基于切片方法
To split a PyTorch tensor into training and validation sets, you can use simple slicing. Here’s a straightforward way to do this:
- Decide on a split ratio (e.g., 80% training and 20% validation).
- Shuffle the tensor (optional, but often a good idea).
- Split the tensor based on the desired ratio.
Here’s an example using a 80-20 split:
import torch# Sample data
X = torch.randn(1000, 10)  # 1000 samples, 10 features each
Y = torch.randint(0, 2, (1000,))# Shuffle data
indices = torch.randperm(X.size(0))
X = X[indices]
Y = Y[indices]# Split ratios
train_size = int(0.8 * X.size(0))
val_size = X.size(0) - train_size# Split data
X_train = X[:train_size]
Y_train = Y[:train_size]
X_val = X[train_size:]
Y_val = Y[train_size:]print(X_train.size())
print(Y_train.size())
print(X_val.size())
print(Y_val.size())
In this example:
- We first shuffled the data by generating a permutation of indices with
torch.randperm(). - We then split the data based on the desired ratio (in this case, 80-20).
- The resulting tensors (
X_train,Y_train,X_val,Y_val) represent the training and validation sets respectively.
This method works well when you have independent and identically distributed data. If you need to perform stratified sampling (e.g., you want to ensure the training and validation sets have similar class distributions), consider using utilities from libraries like scikit-learn to generate the splits, and then index into the PyTorch tensor using those splits.
The torch.randperm(n) function generates a random permutation of integers from 0 to n-1. This is particularly useful for shuffling data. Let’s break down the function torch.randperm(X.size(0)):
-
X.size(0):- This retrieves the size of the first dimension of tensor
X. - If
Xis a 2D tensor with shape[samples, features], thenX.size(0)will return the number of samples.
- This retrieves the size of the first dimension of tensor
-
torch.randperm(...):- This generates a tensor of random permutations of integers from
0ton-1, wherenis the input argument. - The result is effectively a shuffled sequence of integers in the range
[0, n-1].
- This generates a tensor of random permutations of integers from
In the context of splitting data into training and validation sets, the random permutation ensures that the data is shuffled randomly before the split, so that the training and validation sets are likely to be representative of the overall dataset.
交叉验证
To perform n-fold cross-validation on PyTorch tensor data, you can use the KFold class from sklearn.model_selection. Here’s a step-by-step guide:
- Convert the PyTorch tensor to numpy arrays using the
.numpy()method. - Use
KFoldfromsklearn.model_selectionto generate training and validation indices. - Use these indices to split your PyTorch tensor data into training and validation sets.
- Train and validate your model using these splits.
Let’s see a practical example:
import torch
from sklearn.model_selection import KFold# Sample tensor data
X = torch.randn(100, 10)  # 100 samples, 10 features each
Y = torch.randint(0, 2, (100,))  # 100 labels# Convert tensor to numpy
X_np = X.numpy()
Y_np = Y.numpy()# Number of splits
n_splits = 5
kf = KFold(n_splits=n_splits)for train_index, val_index in kf.split(X_np):# Convert indices to tensortrain_index = torch.tensor(train_index)val_index = torch.tensor(val_index)X_train, X_val = X[train_index], X[val_index]Y_train, Y_val = Y[train_index], Y[val_index]# Now, you can train and validate your model using X_train, X_val, Y_train, Y_val
Note:
- The
KFoldclass provides indices which we then use to slice our tensor and obtain the respective training and validation sets. - In the example above, we’re performing a 5-fold cross-validation on the data. Each iteration provides a new training-validation split.
If you want to shuffle the data before splitting, you can set the shuffle parameter of KFold to True.